Can you write a book in Google Docs? You can, but whether you should depends on a few things.
In this post, I’m giving you my best tips for writing your novel with Google Docs and I give you a few alternatives in case you’d rather go with something else.


What is Google Docs anyway?
Google Docs is a free, online word processor. You can use it on desktop but they also have an app, so it’s very easy to use it on all your devices.
All you need is a Gmail account, and you could even start a new account just for your fiction writing projects in case you’d like to have them separate from your professional writing or school stuff. Switching between accounts is very easy and it doesn’t require you to log in every time.
In any case, your content is stored securely and no one on the internet is able to find it and see it without you sharing it on purpose.
The pros and cons of using Google Docs to write your book

Before we get into the “how”, I want to help you make an informed decision. Here are some of the pros and cons of using Google Docs to write a novel that I’ve personally encountered.
Cons:
❌ Gets a little laggy when loading a longer document and you might have to wait to get all the way to the last page
❌ You need to know how to do the formatting yourself if you don’t like the default options
❌ Doesn’t give you any kind of structure when you’re just outlining, and looking at the blank page can be discouraging
❌ More difficult to move things around than in dedicated novel-writing software if you decide to rearrange some parts of your story
❌ Not necessarily intuitive to use if you’re not familiar with Microsoft Word or other similar software
❌ Maybe you don’t want to use Big Google, and that’s understandable
Pros:
✅ Saves automatically so you don’t have to worry about losing progress
✅ Can also be used offline so you can write without internet
✅ Easy to access on almost any device (haven’t tried a smart fridge, though) so you can write anywhere
✅ Easy to use and similar to other word processing software, plus there are plenty of tutorials on YouTube to help you
✅ Easy to share with beta readers and get comments
✅ Easy to export into different formats
If having to do the formatting yourself is a dealbreaker, you might want to opt in to use something else besides Google Docs (read on for a great alternative), but for most of us it’s a very good option if you don’t have any word processing software ready on your computer or if you just enjoy the ease of access.
Next, let’s get into how to set up Google Docs to write a book.
Outlining your story on Google Docs

You should rarely, if ever, dive into writing a story without any kind of a plan. If you’d like to create your outline on Google Docs, here are a few tips.
First of all, you shouldn’t necessarily be thinking about chapters at this point in the writing process. Chapters and page count are things that aren’t really relevant to the STORY, which is why you can think about them later on. What you should care about now are SCENES, and you can read all about them in my post about creating a scene outline.
Instead of thinking about chapters, what should you think about? What I would do is I would look at story structure and then use those different parts of the story to create headings for my story when I’m writing on Google Docs. These headings will then appear in the document outline. You can use them as sandboxes with a rough idea of what you should write at that part of the novel which will save you from that empty page paralysis.
When you’re on desktop, you can find the document outline on the left of the screen (click the menu icon that says “Show document outline” if you can’t see it) and if you’re on mobile, click the menu on the top right corner and choose “Show document outline”.

Above, you can see what the document outline looks like. Here’s how to create those headings:
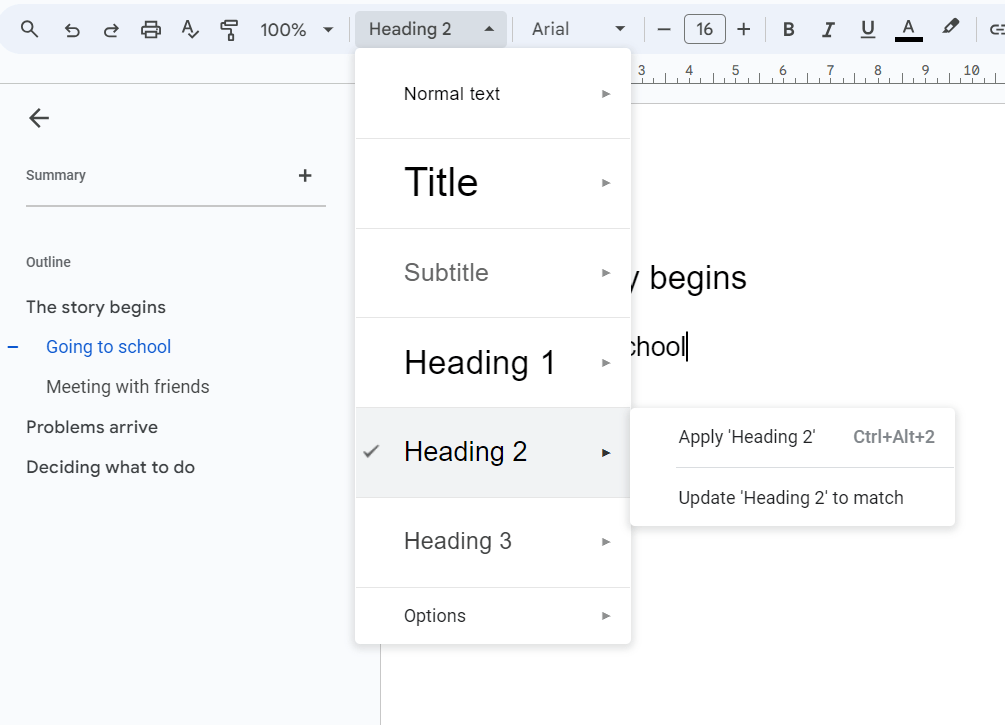
You write your heading title and make sure the blinking cursor is on that line and then you choose “Heading” from the toolbar. Heading 1 is the top level heading and then Heading 2 is what nests under it, as you can see with “The story begins” and “Going to school” if you look at the document outline in the image above.
When you organize your writing this way, it doesn’t only help you plan ahead, but it also makes your manuscript easier to navigate. You can click on any of the headings in the document outline to jump straight to it – this will save you a lot of time scrolling back and forth.
How to write a book in Google Docs with my novel outline template

If you’d like to organise your novel outline the easy way, I’ve made something that’s going to help you get over writer’s block and the fear of having to stare at that blank screen and blinking cursor.
My novel-writing template for Google Docs follows story structure and helps you plan the journey that your hero needs to take. Story structure is not the same as formula and using this template won’t produce identical stories! What story structure is is the underlying structure of almost all the stories you know and love.

The template comes pre-formatted with your top level headings and there’s a description of what should happen at each part of the story. You can then use those second-level headings we talked about earlier to name each scene you include in that part. Don’t worry, the instructions are included in the template.
The template comes with links to relevant blog posts so you can be sure you’re well-equipped to outline and write that novel you’ve dreamt of writing. I couldn’t just leave you without my best advice!
After you’ve outlined your novel or after you’ve written your first draft, you can remove all the instructions and other stuff that you won’t need any longer and continue with editing your novel.

Want to write a romance novel on Google Docs? We’ve got a template for that, too
If it’s a romance novel you’re planning to write, we’ve got a Google Docs template specifically for romance novels!

The basic idea is the same, but you also get the steps to the inner journey that your lovers need to take before they get their happy ending. So many writers have already loved using this template and I have to say I’m pretty proud of it! There’s also an enemies to lovers version, if that’s more your jam.
Formatting your novel on Google Docs
Formatting your novel on Google Docs is not that difficult, though it’s generally best to do before you’ve already written hundreds of pages in case something unexpected happens.
“Normal text” is the default for all the writing on Google Docs, and if you want to change the font or font size for normal text, do this: Make the changes to something you’ve written, click “Normal text” from the toolbar and then “Update ‘normal text’ to match”. Easy! It works similarly with your headings.

If you want to change the line spacing, you click the “Format” menu and then “Line & paragraph spacing”. 1.5 is the most common option and it’s hard to go wrong with that, plus it simply looks comfortable to read.
How to start each chapter on a new page
If you want to start your new chapter or scene on a new page, don’t just hit enter until you get there! That might do what you want once, but if you end up making changes to your text, your chapter will end up starting from a different place. Instead, you need to add a page break.
You can add a page break either with ctrl + enter (or command + return on Mac) or you can choose “Insert”, then “Break” and then finally “Page break”. That way your next line will always neatly start from the next page.
Formatting your manuscript for self-publishing
If you want to self-publish what you’ve written, there are probably better options to format and export your manuscript than Google Docs. If you want to publish on Amazon, you do need to follow their guidelines.
But if you’re planning to sell your book somewhere like Etsy or on your own website, you can decide for yourself how you want to format it. Just remember you’ll have to create the cover for your book (I would use Canva if I had to create it myself but personally I’d rather outsource it) and you also have to take page numbers into account. (In Google Docs, you can add page numbers when you choose “Insert” and then go all the way down to “Page numbers”.)
Formatting your manuscript for querying
If you’re hoping to get traditionally published and you want to send your finished manuscript to agents and/or publishers, be sure to follow their formatting guidelines before you export your manuscript. Most likely you’ll end up with multiple versions of your manuscript, and you can choose to make all the changes to one Doc and then exporting it with different options each time, or you can make a copy of your Doc and then apply the changes to your copies.
If you don’t know how to change something and I haven’t included it in this post, you can always find answers if you google for “how to … in Google Docs”. There are usually Youtube videos that’ll show you exactly what to do but you can often find blog posts just like this one if you’d rather read than watch a video.
Tracking your word count on Google Docs
Tracking your word count in Google Docs is easy and it lets you see how much progress you’ve made.
When you click the “Tools” menu, you can find “Word count” right near the top. (The keyboard shortcut on Windows is ctrl + shift + C.) You’ll also be able to see your page and character count. If you check the “Display word count while typing” it’ll appear in the bottom left corner. (Note: you can’t do this on mobile, though you can always go check your word count in the menu.)

If you highlight a part of your writing, you’ll be able to see how many words and characters there are in that section and in the entire document, which can have its uses as well. For example, you can compare the word count in different chapters of your novel.
After you’ve learned how to write a novel on Google Docs, it’s time to move on to editing that bad boy to perfection.
Editing a novel on Google Docs

Google Docs has a couple of cool features you can use when you’re editing your novel.
As I say in my article on editing your novel successfully, you shouldn’t edit everything you see during every draft. Instead, you should focus on a single aspect of your novel at a time. If you see something you need to fix but it’s something other than what you should be focusing, or even if it’s something you don’t know how to fix right now, you can easily leave yourself a note about it.

You can use the highlight tool in the toolbar to highlight a part of your writing that you want to pay attention later. You could even use different colours for different issues, for example yellow for things you need to change and red for things you need to remove.

If you’d like to leave yourself more specific feedback, you can also leave a comment and write down what’s wrong with your writing. Just do a favour to your future self and leave an actually useful comment – I can’t tell you how many times my own notes say something like “fix this, dummy” and I’m not even sure what it means when it’s time to fix it. I really am the dummy.

Version history is another useful tool you might not find in all word processing software unless you make a point to save your versions to different save files, and even then it’s not quite the same. When you go to “File” and then to “Version history”, you can name your current version (for example “First draft”) and you can also see what kind of changes you’ve made. That way you won’t lose your writing if you ever regret deleting something from your novel.
Getting feedback on your writing with Google Docs
At some point, you might want to get feedback from your critique partner or beta readers. Fortunately, Google Docs makes this easy.
Just click the big “Share” button on the upper right corner and choose who you want to share your document with. You can either enter their email addresses or you can create a link that they can follow. If you want to give them a link, choose “Anyone with the link” and then choose their role. If you choose “Commenter”, they’ll be able to leave comments just like you did earlier. They won’t be able to make any changes to your writing unless you choose “Editor”, so don’t worry about your writing suddenly going missing if your beta reader goes rogue.

Exporting your book from Google Docs
Once your wonderful novel is finished, you can export it and send the file to whoever you need to.
All you have to do is click “File” and then “Download”, and then you just choose the file type you want. PDF is probably the best option in most instances as it can be viewed on pretty much any device.

Alternatives to Google Docs for writing your novel
Although I think Google Docs is great, I don’t personally use it to write my novels. I do use it for shorter ebooks when I need to create something for my Etsy shop and I plan some of my content there, but there are other tools I prefer to use when it comes to writing fiction.

First of all, I use yWriter when I’m writing the earlier drafts of my novels because it lets me focus on one scene at a time and I can easily rearrange scenes if needed. Many writers enjoy using Scrivener, but yWriter is so much more lightweight and it doesn’t have such a steep learning curve. Also, it’s free, but I actually have a paid licence because I like it so much.
Once I’ve got my scenes in order, I transfer my manuscript to LibreOffice Writer. It’s like Microsoft Word except it’s free, so if you’re used to Word, it’ll be very easy for you to use it. LibreOffice Writer is where I finish all the remaining drafts of my novel and it has all the functionality I need, which is navigation between chapters (using headers like in Google Docs) and the ability to highlight text and leave comments for myself.
Now you might be wondering if I’m worried about my computer crashing and me losing all my writing, which is what wouldn’t happen with Google Docs. I DO worry about that, which is why my save file goes in my Dropbox folder. That way it’s in the cloud and I’ll be able to access it on other computers if needed. You can do that automatically when you have Dropbox installed to your computer so you’ll know it’s there every time you press Ctr + S and you don’t have to remember copy any files after your writing sessions.
All the options I’ve shown you in this post require you to do all the formatting yourself, but what if you could use something that did all the design for you? Reedsy Book Editor takes care of the formatting for you and all you need to do is write. It even creates the legal pages (you just fill in the blanks) and the table of contents for you, and you can export your book as a PDF or EPUB. According to them, your book will be “distribution ready”, which basically means you don’t have to worry about all the stuff that makes your book look professional.
Are you ready to write your novel now?
Starting your novel is no small task and you need to know more than just where you’re going to write. In fact, there’s so much to think about that it’s very easy to keep postponing it indefinitely – and I don’t want this to happen to you. This is why I created my free course that helps you start writing your novel in less than a week.
Join us today and you could be writing your first draft just a week from now. I can’t wait to find out what you’re going to be writing about.
Protagonist Crafts is a blog about writing fiction, written by a published author and creative writing teacher. You can find more writing tips and inspiration in the blog and you can get the best author tools at Writer Lifestyle on Etsy.
Wow. I’ve been using Google Docs to write my novels and Google Sheets to aid in outlining and keeping track of what goes where, word counts, summaries, etc. You’ve given me more info on how to use Docs. Domo arigato!
I’m glad you found it helpful!